FIN is a decentralised, permissionless, orderbook-style DEX that allows users to trade assets easily. However, getting started may be daunting for users that are new to this style of trading experience. This article will guide you through your first steps on FIN, understanding the UI, and how to place trades to prepare you for a smooth trading experience. Due to the length of the article, we have provided a table of contents that you can click on to skip to each section.
Table of Contents
- Getting USDC Onto FIN
- Depositing Other Assets Into FIN
- Using IBC Transfer to bridge ATOM to Kujira
- Connecting Your Wallet
- Explanation Of The User Interface
- Limit vs Market Orders
- Different Trading Phases Of FIN
- Placing A Market Order
- Placing A Limit Buy
- Placing A Limit Sell
- Fees
- FAQ
Getting USDC Onto FIN
To get USDC onto FIN, you have three options:
- Bridge axlUSDC from Avalanche, Polygon or Fantom to be deposited into Kujira mainnet.
- Bridge native USDC from Ethereum to Kujira Mainnet.
- Deposit USDC directly from a CEX (such as Binance or Coinbase) into Kujira.
We’ll go through each step in detail to make the process as easy as possible for you. Reminder: You can only bridge axlUSDC, not native USDC. Here are some steps to convert USDC to axlUSDC on different chains:
Converting USDC.e On Avalanche To axlUSDC
To bridge USDC.e from Avalanche to Kujira mainnet, you will need to convert it to axlUSDC via the curve pool.
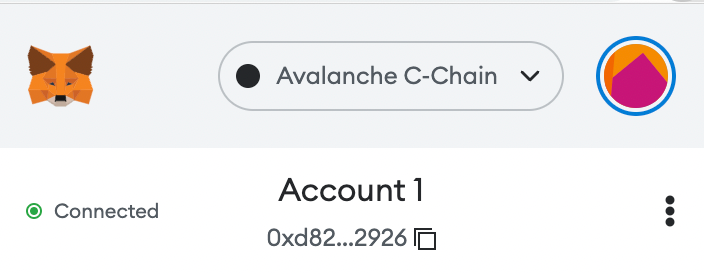
1.Connect to Avalanche C-Chain in your Metamask wallet. A guide for doing so can be found here.
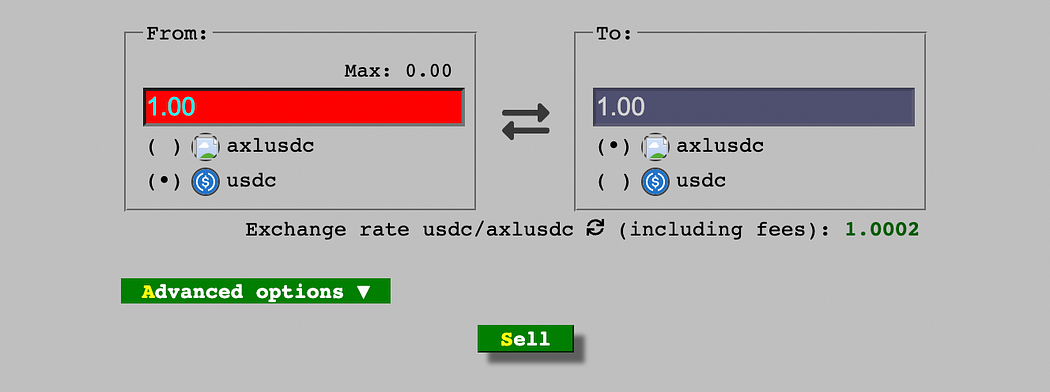
2. Configure the curve pool to show USDC on the left, and axlUSDC on the right as shown below:
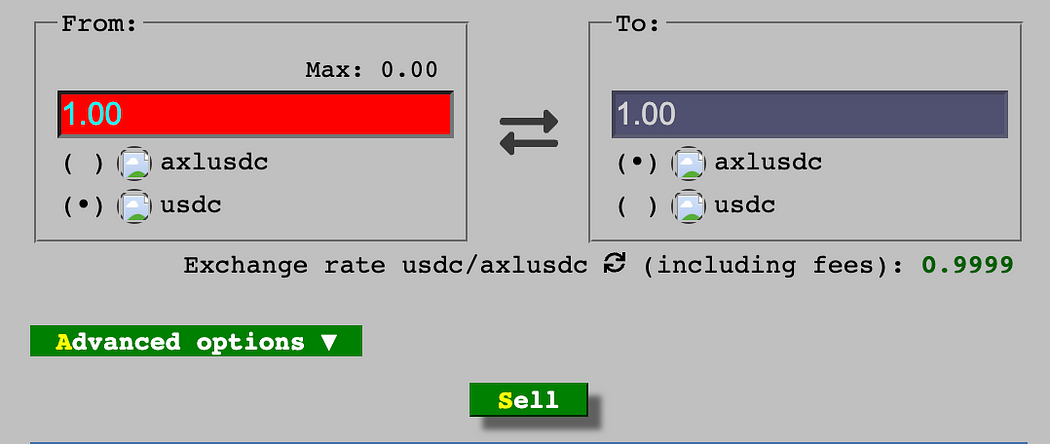
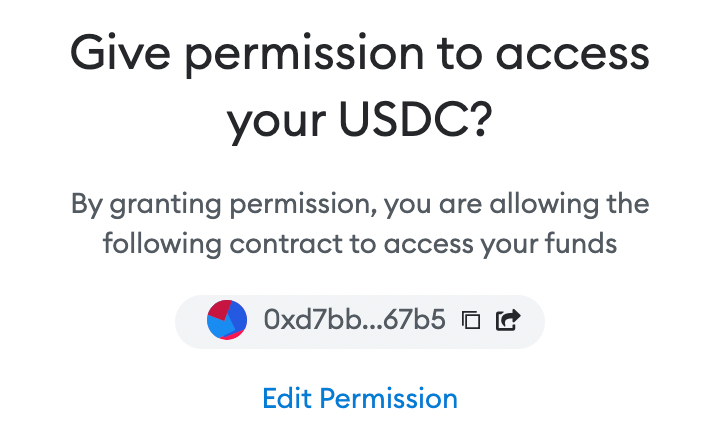
3. Click the green “Sell” button. You may need to give the curve contract permission to access your USDC if this is the first time using Curve.
Once permission has been granted, you can now approve the transaction to convert USDC to axlUSDC. This is now ready to be bridged to Kujira mainnet. When bridging axlUSDC from Avalanche to Kujira, make sure to configure the left side of the bridge to show “Avalanche”.
Converting USDC On Polygon To axlUSDC
To bridge USDC from Polygon to Kujira mainnet, you will need to convert it to axlUSDC via the curve pool.
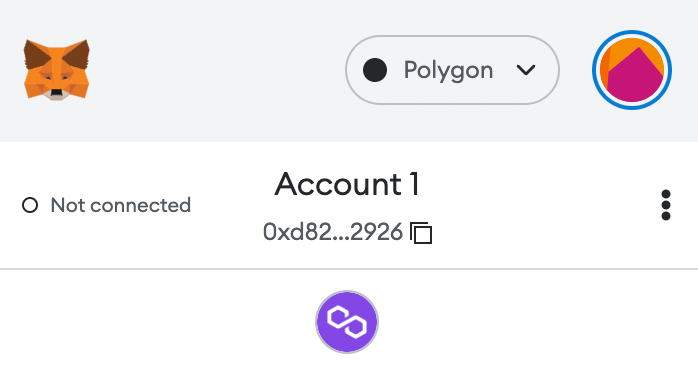
- Connect to Polygon in your Metamask wallet. A guide for doing so can be found here.
2. Configure the curve pool to show USDC on the left, and axlUSDC on the right as shown below:
3. Click the green “Sell” button. You may need to give the curve contract permission to access your USDC if this is the first time using Curve.
Once permission has been granted, you can now approve the transaction to convert USDC to axlUSDC. This is now ready to be bridged to Kujira mainnet. When bridging axlUSDC from Polygon to Kujira, make sure to configure the left side of the bridge to show “Polygon”.
Converting USDC On Fantom To axlUSDC
To bridge USDC from Fantom to Kujira mainnet, you will need to convert it to axlUSDC via the curve pool.
- Connect to Fantom Opera in your Metamask wallet. A guide for doing so can be found here.
2. Configure the curve pool to show USDC on the left, and axlUSDC on the right as shown below:

3. Click the green “Sell” button. You may need to give the curve contract permission to access your USDC if this is the first time using Curve.
Once permission has been granted, you can now approve the transaction to convert USDC to axlUSDC. This is now ready to be bridged to Kujira mainnet. When bridging axlUSDC from Fantom to Kujira, make sure to configure the left side of the bridge to show “Fantom”.
Bridging axlUSDC To Kujira Mainnet
- Make sure that you have axlUSDC on either Avalanche, Polygon or Fantom in MetaMask.
2. Go to https://blue.kujira.app/bridge.
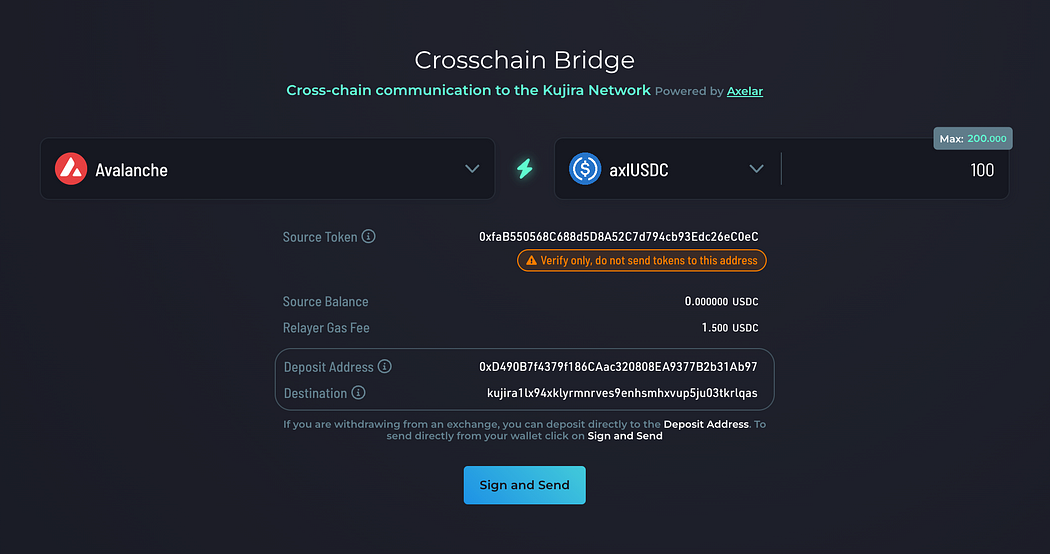
3. Connect to your Keplr wallet in the top right corner of the UI and configure the bridge to show either Avalanche, Polygon or Fantom on the left, and axlUSDC on the right as shown below. The network shown on the left should match the network on which you have axlUSDC currently.
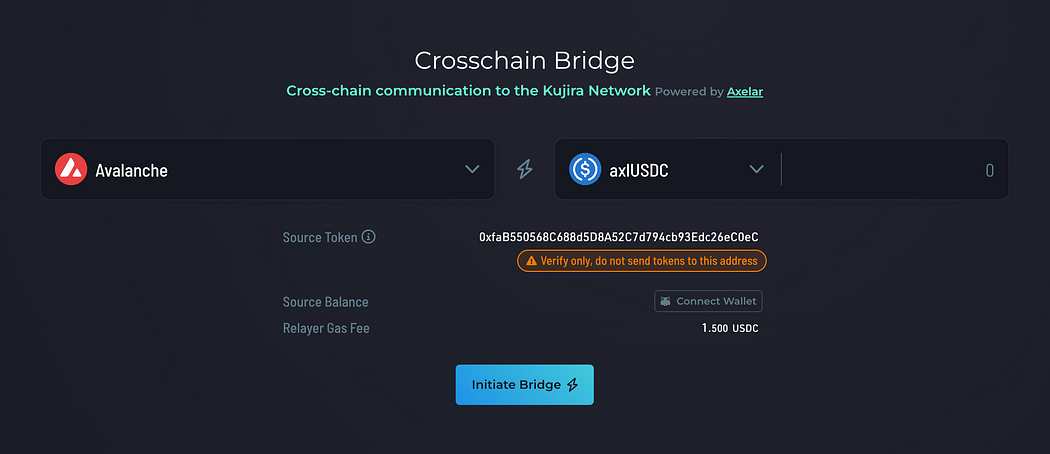
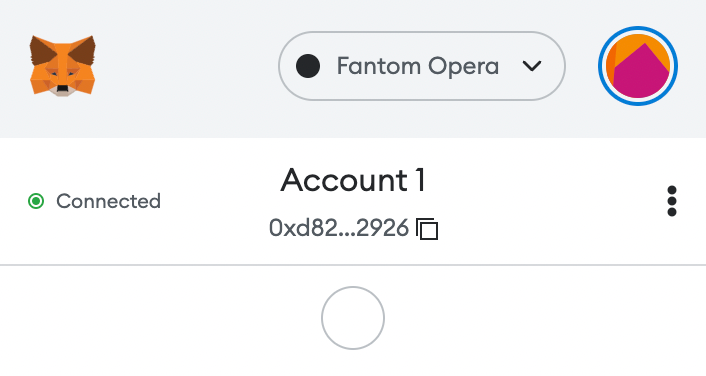
4. Next to “Source Balance”, click Connect Wallet and approve the popup on MetaMask.
5. You should now see the axlUSDC currently available in your wallet. Input the amount of axlUSDC you wish to migrate to Kujira, but remember to have some AVAX/MATIC/FTM for fees. You’ll need to pay both a bridge fee and the normal gas fee to transfer between wallets.
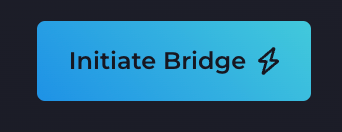
6. Click initiate bridge.

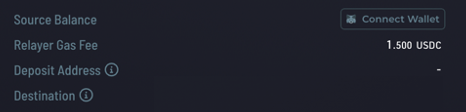
7. Once a deposit address has been created, the “Initiate Bridge” button should change to say “Sign and Send”. Click this and approve the transaction to finish the bridging process.
8. Click on the green text that will appear in the middle of your screen when the transaction is successful. This will take you to the Axelar block explorer where you can track the progress of your specific transfer. It won’t appear immediately, but after about a minute your transfer will show up and indicate when bridging has been completed.
9. You now have axlUSDC on FIN to spend! You will need to change the asset you use for fees by following the instructions in this guide under the heading “Connecting Your Wallet”.
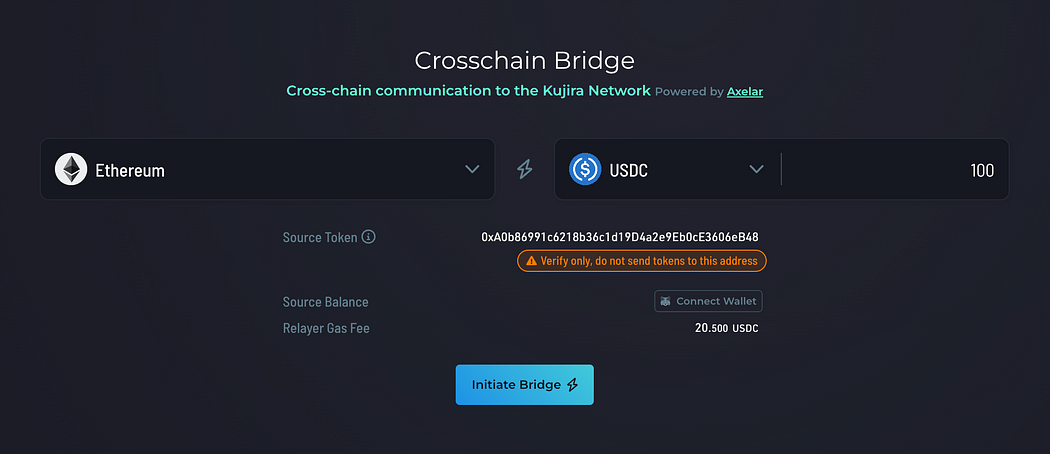
Bridging Native USDC On Ethereum Network To Kujira
1.Make sure that you have native USDC on the Ethereum network in MetaMask
2. Go to https://blue.kujira.app/bridge.
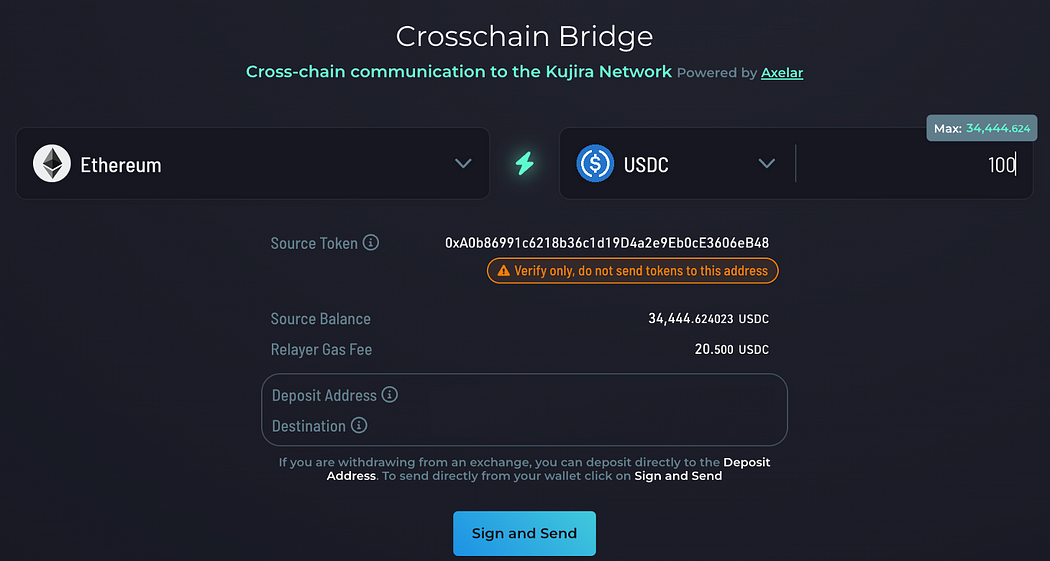
3. Connect to your Keplr wallet in the top right corner of the UI and configure the bridge to show Ethereum on the left, and USDC on the right as shown below.
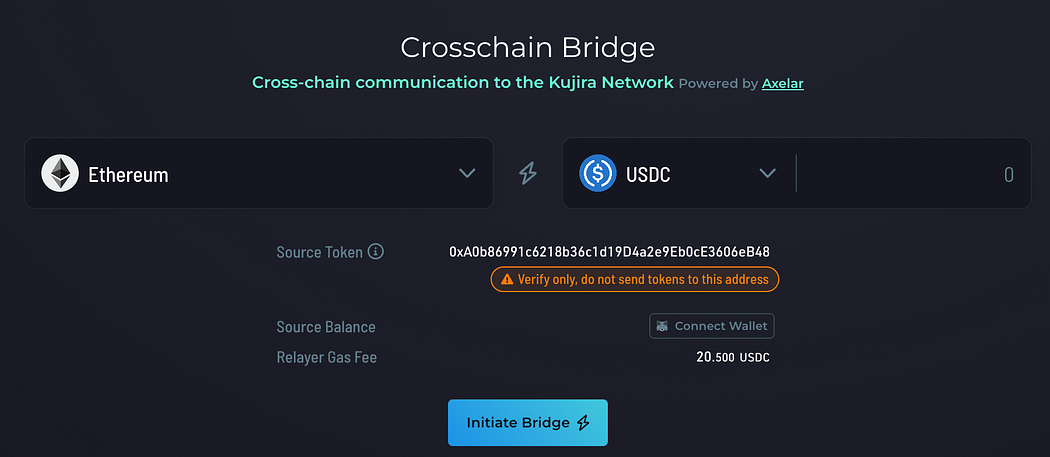
4. Next to “Source Balance”, click Connect Wallet and approve the popup on MetaMask.

5. You should now see the USDC currently available in your wallet. Input the amount of USDC you wish to migrate to Kujira, but remember to have some USDC for fees. You’ll need to pay both a bridge fee and the normal gas fee to transfer between wallets.
6. Click initiate bridge.
7. Once a deposit address has been created, the “Initiate Bridge” button should change to say “Sign and Send”. Click this and approve the transaction to finish the bridging process.
8. Click on the green text that will appear in the middle of your screen when the transaction is successful. This will take you to the Axelar block explorer where you can track the progress of your specific transfer. It won’t appear immediately, but after about a minute your transfer will show up and indicate when bridging has been completed.
9. You now have USDC on FIN to spend! You will need to change the asset you use for fees by following the instructions in this guide under the heading “Connecting Your Wallet”.
Withdrawing Directly From A CEX
Before we get into these steps it is extremely important to remember that only native USDC can be withdrawn on the Ethereum network. No other networks can be used at this stage.
1.Go to https://blue.kujira.app/bridge.
2. Connect to your Keplr wallet in the top right corner of the UI.
3. Configure the bridge to show Ethereum on the left-hand side, and USDC on the right as shown below. This is incredibly important as you need to produce an Ethereum deposit address or your funds will be lost.
4. Click initiate bridge — this will produce a deposit address that you can use to withdraw USDC directly from a CEX. Remember, you can only withdraw USDC from the CEX, NOT axlUSDC.
5. Copy this deposit address generated into the withdrawal address from the exchange, ensuring that you withdraw on the Ethereum (erc20) network.
This address is ONLY for that network, token and recipient address, you will need to create a new address each time you withdraw. It is worth trialling this process with a small amount of capital first.
6. Once sent, the CEX will provide you with a transaction hash. You may check the progress of your withdrawal by inputting the transaction hash into the Axelar block explorer here. Once the withdrawal is complete, USDC should appear in your wallet if you hover over your Kujira address in the top right corner.
Depositing Other Assets Into FIN
When trading on FIN, you will have the option to use many different assets for fees that are supported by the Axelar bridge (with IBC assets coming soon). To deposit these assets into FIN, follow the instructions below, however be sure to read the next section titled “Connecting Your Wallet” as it contains vital information on how to change the asset used for fees.
1.Go to https://blue.kujira.app/bridge.
2. Connect to your Keplr wallet in the top right corner of the UI.
3. Configure the bridge to show the asset you wish to deposit on the right, and the network the asset must be transferred on to the left. Most exchanges will give you a list of networks that each asset can be transferred on when you attempt to withdraw, so make sure this matches the network on the bridge. If you’re unsure, drop us a message in the Telegram. Sending assets on the wrong network will result in them being lost permanently.
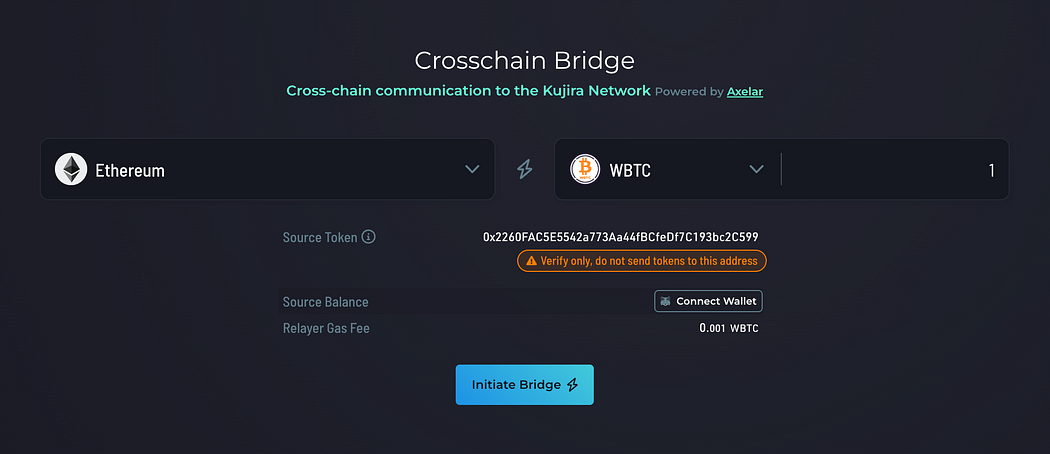
4. Next to “Source Balance”, click Connect Wallet and approve the popup on MetaMask. The Connect Wallet button will be greyed out if you are attempting to transfer assets on the wrong network. Additionally, if you are connected to the wrong network on your MetaMask, a popup will prompt you to change this in the extension.
5. Click initiate bridge — this will produce a deposit address that you can use to withdraw the quoted asset directly from a CEX.
6. Copy this deposit address generated into the withdrawal address from the exchange, ensuring that you withdraw on the correct network. This address is ONLY for that network, token and recipient address, you will need to create a new address each time you withdraw.
7. Once sent, the CEX will provide you with a transaction hash. You may check the progress of your withdrawal by inputting the transaction hash into the Axelar block explorer here. Once the withdrawal is complete, the asset should appear in your wallet if you hover over your Kujira address in the top right corner.
Using IBC Transfer to bridge ATOM to Kujira
Note — You may also use the IBC Transfer to bridge other IBC-enabled assets, but for the sake of simplicity I will show you how to bridge ATOM. You may follow the same steps for your asset of choice.
1.Navigate to the Cosmos IBC Transfer bridge on BLUE.
2. Connect your wallet in the top-right, and configure the bridge as shown below:
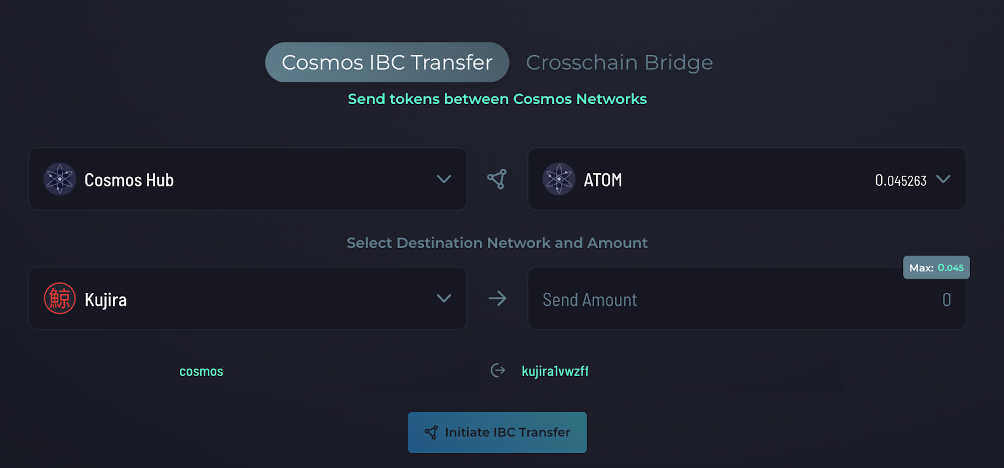
3. When you choose CosmosHub in the top-left box, you may be required to approve a transaction on Keplr to add the network.
4. Input the number of ATOM tokens you wish to bridge over to Kujira in the bottom-right box. Make sure to leave enough ATOM to pay the gas fees for bridging.
5. Click “Initiate IBC Transfer” button and approve the transaction in Keplr.
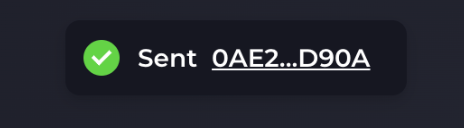
6. When the transaction is complete, you will receive a popup (shown below) that once clicked will take you to mintscan. This is the blockchain explorer for Cosmos and it can be used to track the progress of the bridged asset.
7. Refresh your web browser and your ATOM should be found in your Kujira wallet.
Connecting Your Wallet
To trade on FIN, you must connect a Keplr wallet to the Kujira mainnet. This step will be different depending on whether you:
- Have an existing Kuji balance included in the snapshot
- Are a new user and want to pay fees with other assets
Existing Kuji Balance Included In The Snapshot
If you owned any KUJI tokens before the snapshot was taken in May, you’ll be able to use these for fees. Make sure that you have migrated these tokens from your Terra wallet by following the steps in this Medium article.
Once migrated, simply click “Connect Wallet” and add Kujira mainnet to the wallet via the popup if you haven’t done so already. As a warning, there may be two popups that you must approve in order to add the Kuijra network to Keplr.
A New User That Wishes To Pay Fees With Assets Besides Kuji
As a new user, you’ll need to change the gas denomination since you won’t have KUJI tokens for fees. After following the instructions in the previous sections, you should have either USDC or another asset in your Kujira Keplr wallet. You can check if this process has been successful by hovering over your wallet address in the top right of the UI to see which assets are in your wallet.
- Make sure to connect your wallet in the top right corner, and then hover over the same wallet to reveal a dropdown. Here, you may change the gas denom to any of the available assets in your wallet.
- Once you’ve selected the new gas denom, you’ll need to re-add the network to Keplr. This process is unavoidably convoluted, so pay attention here!
- Open the Keplr browser extension by clicking the jigsaw icon next to the search bar.

- Click on the network dropdown in Keplr, and change the network to one that isn’t Kujira.
- Remove the Kujira network by clicking the “X” beside it (you should notice an X appears beside it after connecting to another network).
- Refresh the web browser, and connect your wallet again. You’ll now get a prompt to re-add the Kujira network by clicking “Approve”.
- Now you are connected to Kujira mainnet, with the correct gas denom configuration to allow you to start trading. Unfortunately, you will need to repeat this process every time you change gas denom. This means that if you purchase Kuji tokens and wish to pay fees using that, you will need to repeat these steps. We are already working on an alternative solution to this, so stay tuned for more updates.
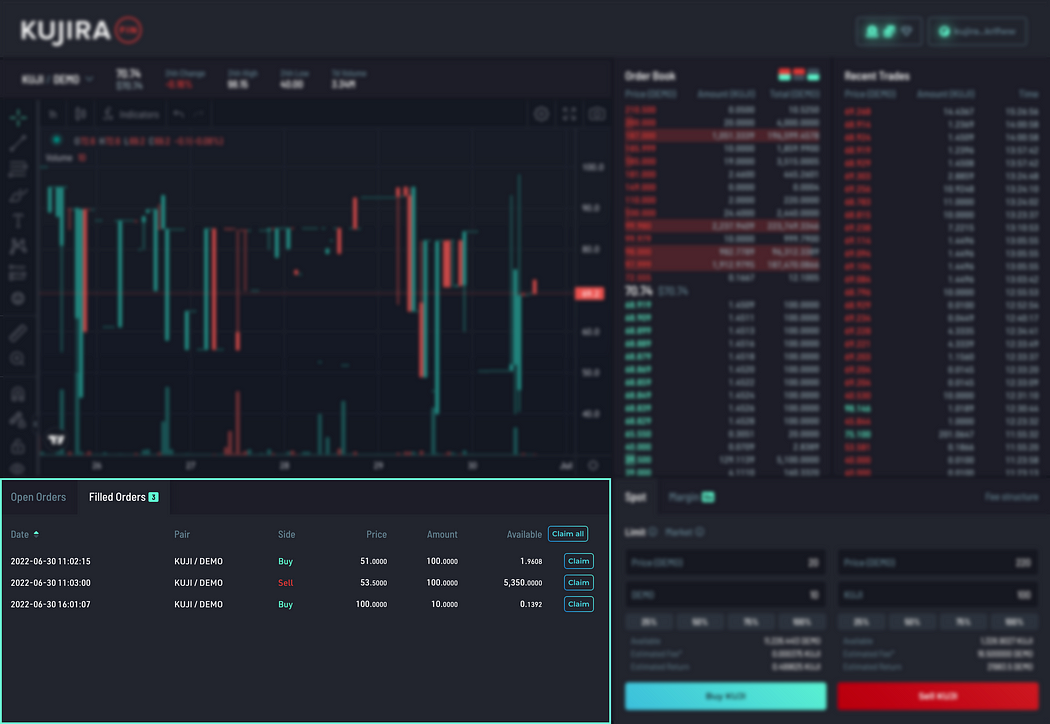
Explanation Of The User Interface
Changing trading pair
By hovering over the down-arrow, a list of all available asset pairs currently tradeable on FIN will appear. To change trading pairs, simply click on the desired pair.
Information on Price and Volume
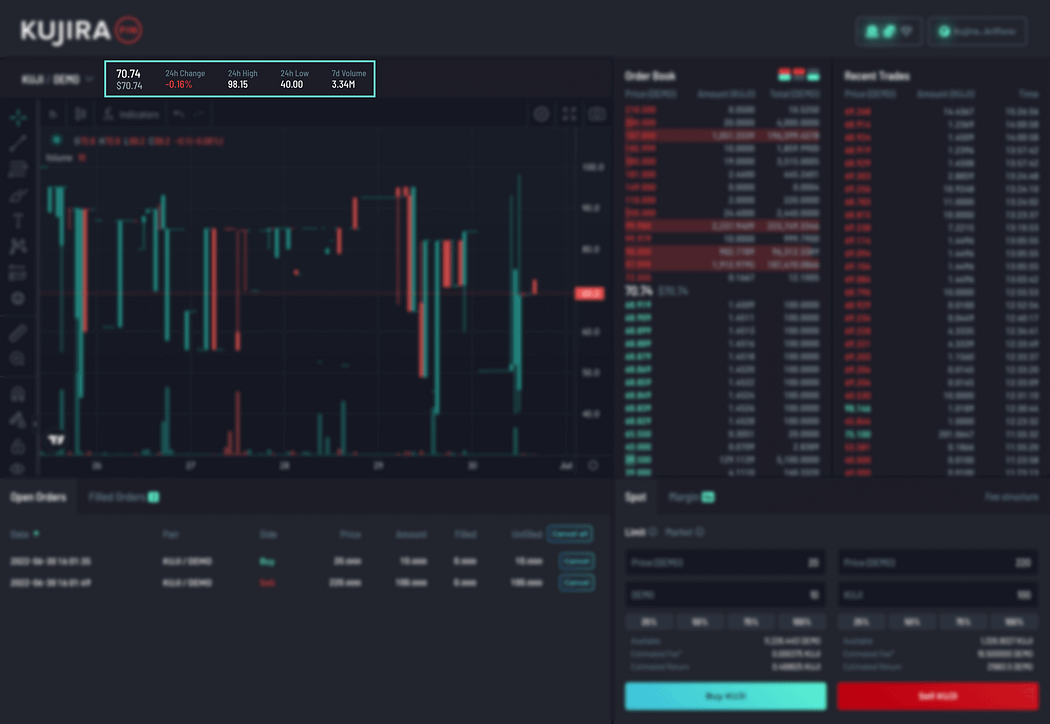
Next to the current trading pair, you’ll find information on how price has changed over the last 24 hours, and the highest/lowest price traded in this time. This may help you to compare the current price to the trend in the last 24 hours. Finally, the 7d volume is the total amount of the quoted asset that has been traded in the past week.
Price Chart
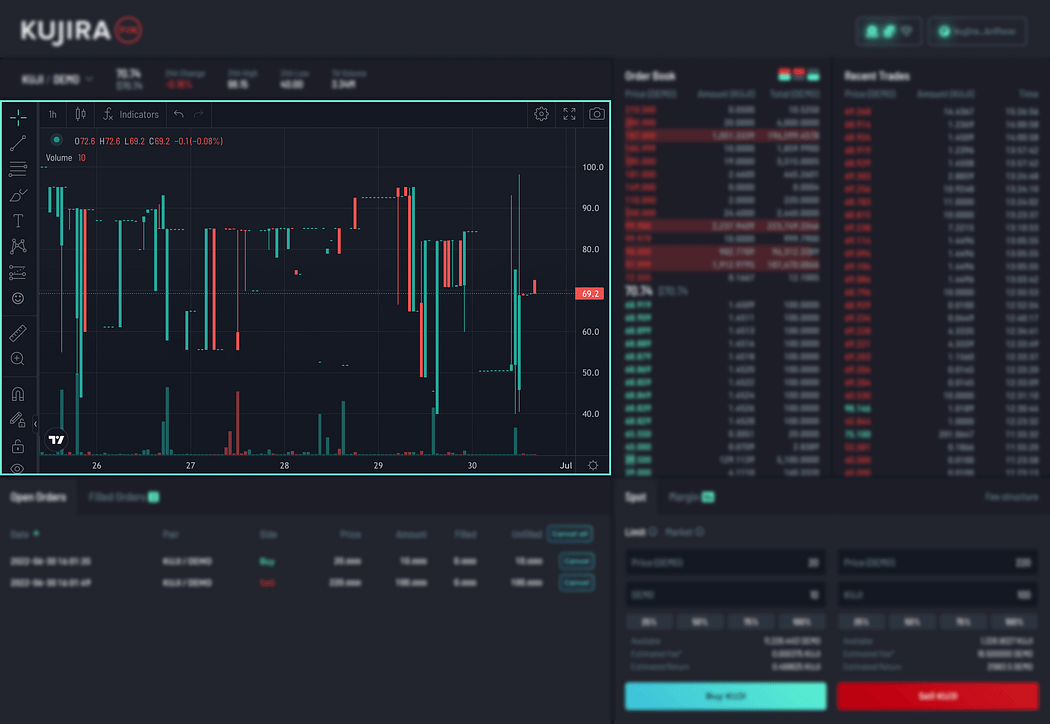
To the left, you will find the price chart of the asset you are looking at. This is organised with price on the vertical axis and time on the horizontal axis. Additionally, a bar chart above the time axis represents the volume traded during each time period.
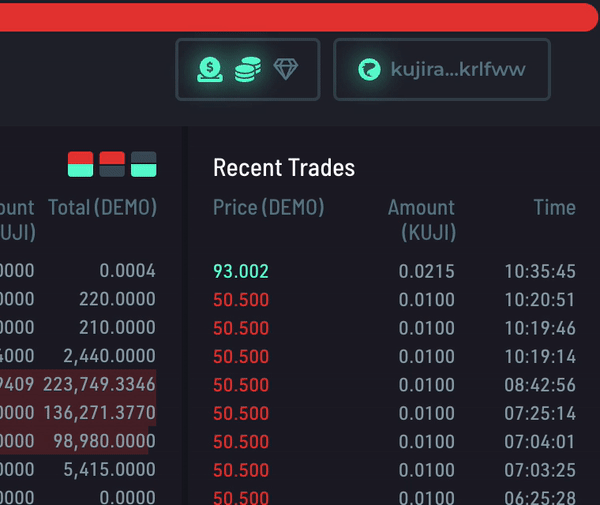
The Orderbook
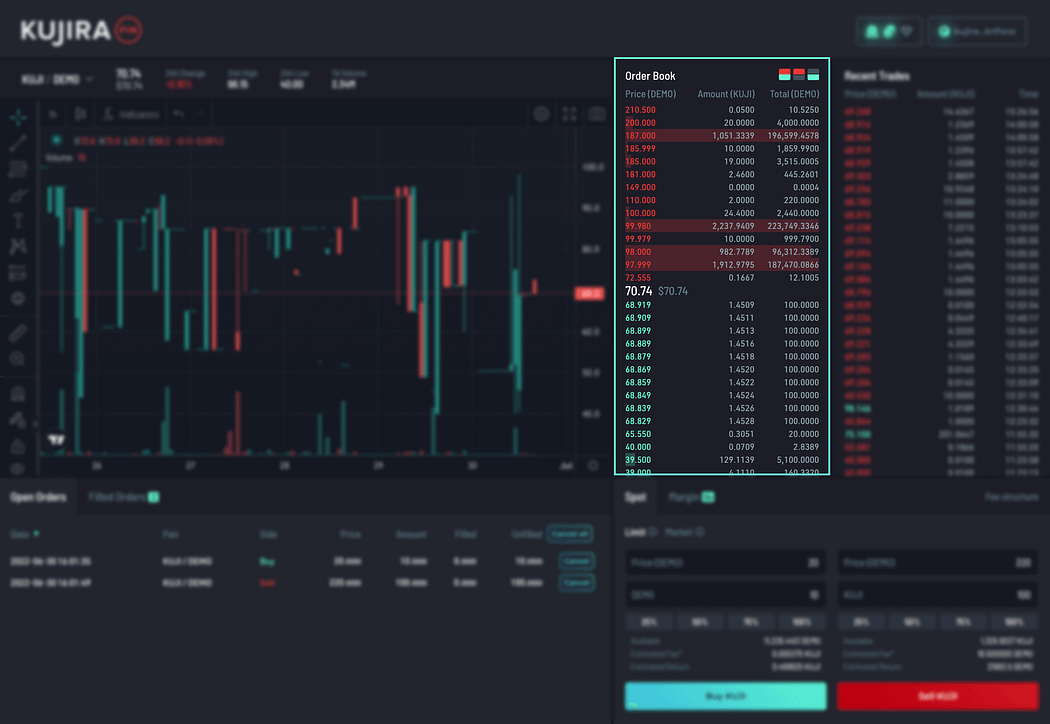
The orderbook provides a list of bids (buy offers) in green and asks (sell offers) in red. These represent the price and amount at which buyers and sellers are willing to trade the selected asset. By monitoring the orderbook, traders can see the depth of liquidity available in the orderbook at any given time.
Buy-side
In green, you can see the list of prices that buyers are willing to purchase an asset from you in ascending order. The highest price is found at the top and represents the fairest/best price currently available to sell.
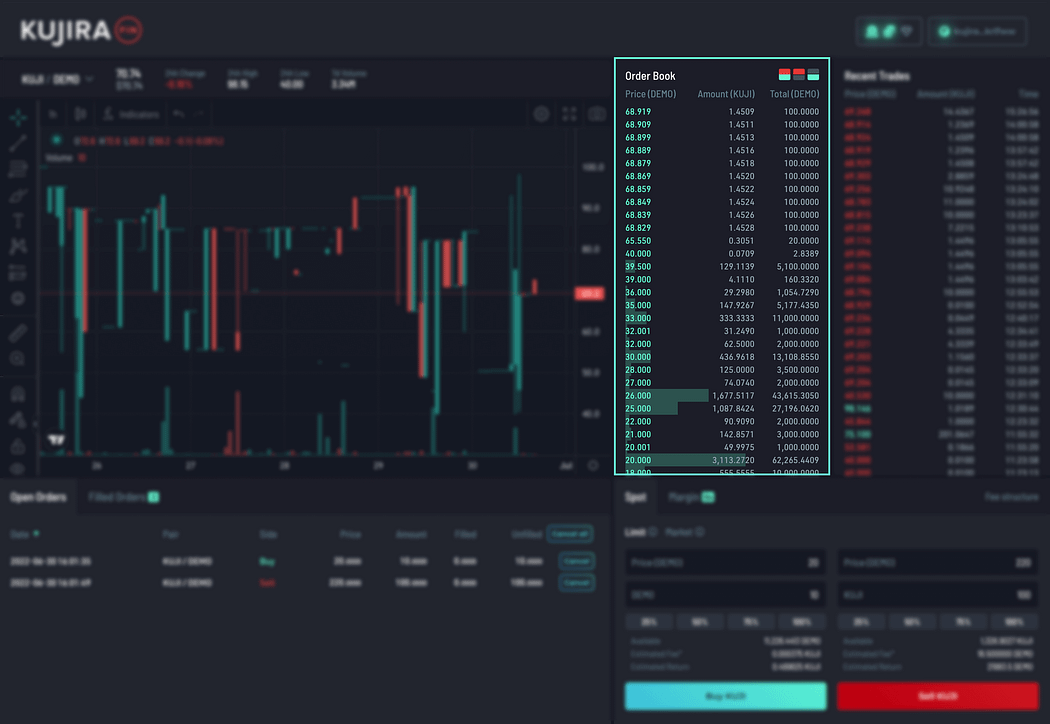
Sell-side
In red, you can see a list of prices at which traders are willing to sell an asset to you in descending order. The lowest price is found at the bottom and represents the fairest/best price to purchase at currently.
Between both orderbooks, you will see the current market price of the underlying token. This is calculated by simply averaging the lowest ask and highest bid. For example, a lowest ask of $185 and a highest bid of $86 would produce a market price of $135.50.
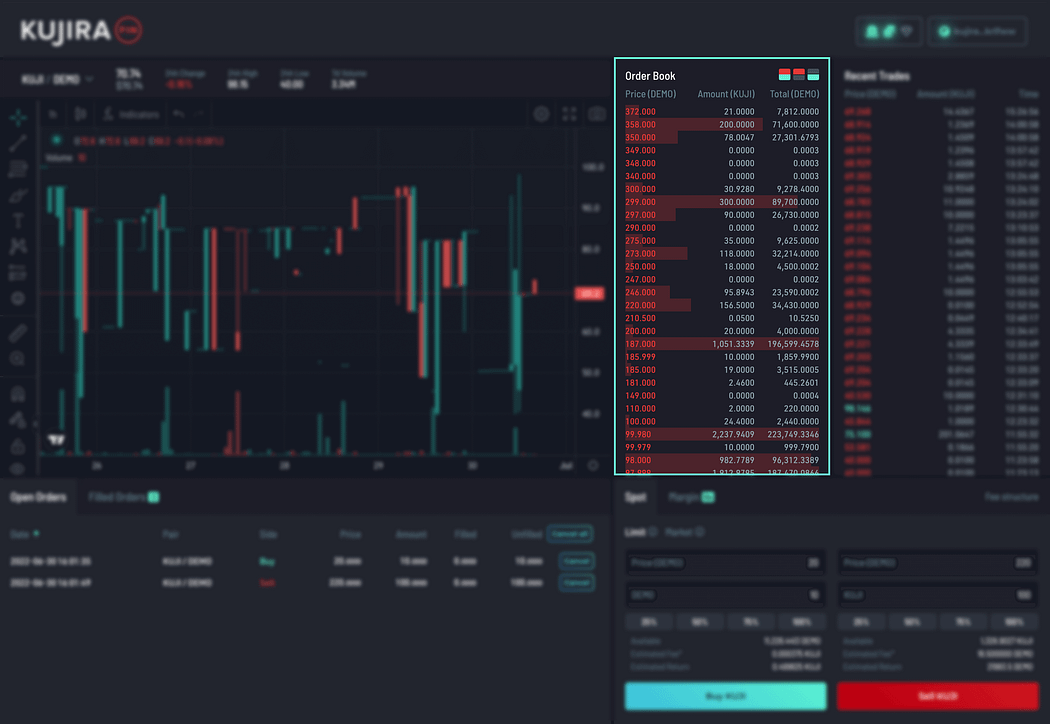
Changing The Orderbook UI
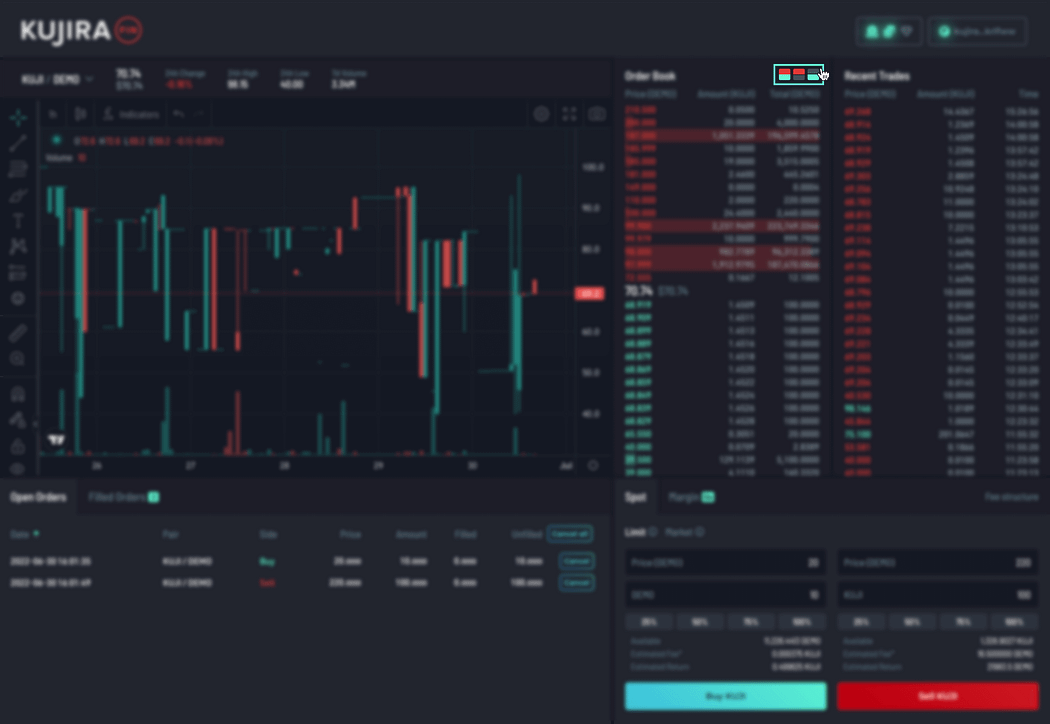
You may change the layout of the orderbook by clicking the icons in the top right corner. The first icon represents the default, where you can see both asks and bids. By clicking the second icon, you can change this to show only the asks to get a better understanding of the sell-side liquidity/offers.
Recent Trades

On the far right-hand side of the UI, you can see all the recent successful transactions that have occurred. These are listed in chronological order and show exactly how much of the underlying asset has been bought/sold recently.
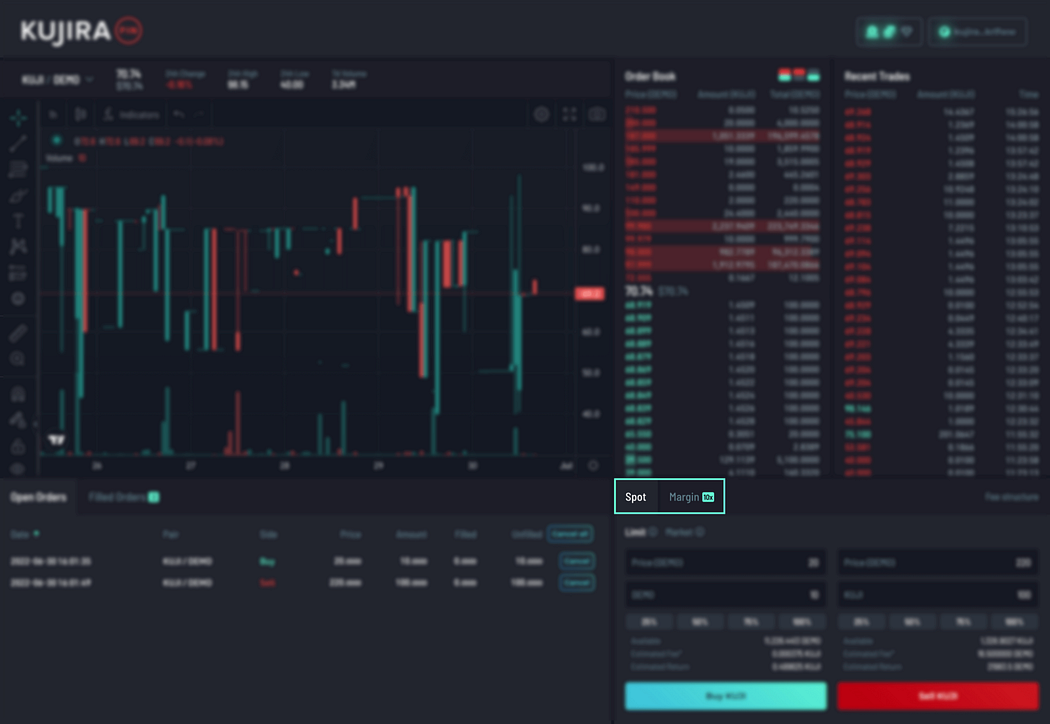
Limit vs Market Orders
When trading cryptocurrencies on FIN, you have the choice of using “Limit Orders” or simply “Market” trading assets. You may switch between these order types by clicking on the respective option here:
Market Orders
A market order is an order to buy or sell a token at the current market’s best available price.
For example, a market buy will execute at the lowest ask in the orderbook, represented by the order at the bottom of the sell-side orders. The market buy will continue to fill the next lowest ask until your order has been filled.
On the contrary, a market sell will execute at the highest bid in the orderbook, represented by the order at the top of the buy-side orders. It will continue to move through the orderbook in descending order until your trade has been filled.
If you are attempting to use market orders to buy/sell large orders, you must pay attention to the liquidity in the orderbook; if liquidity is low relative to your order size, you risk trading at an unfair price due to slippage.
Limit Orders
A limit order is buying or selling a token at a specified price or better. For example, a limit buy at $15 will only execute orders at $15 or below it, never above. On the other hand, a limit sell at $15 will only execute orders at $15 or above it, ensuring you never execute a trade at a price worse than your quote.
Partial Fills
Limit orders introduce another concept — partial fills. A partial fill occurs when only a fraction of your limit order is “filled” (or bought/sold) and can occur for a variety of reasons. This may be because the price suddenly moves in the opposite direction away from your limit, or too few traders entered the market to execute your order.
For example, a limit buy order may be partially filled if there were not enough traders to sell you the tokens you wished to buy at the limit price. This will remain partially filled until more sellers come into the market at your limit price to finish executing the trade.
25%, 50%, 75% And 100% Hotkeys
In the section where you can place trades, you’ll notice hotkeys labelled with 25% e.t.c. Using these hotkeys, you can automatically trade with a set % of owned assets in your wallet. For example, by clicking 25% you’ll be trading with 25% of the tokens you own in your wallet.
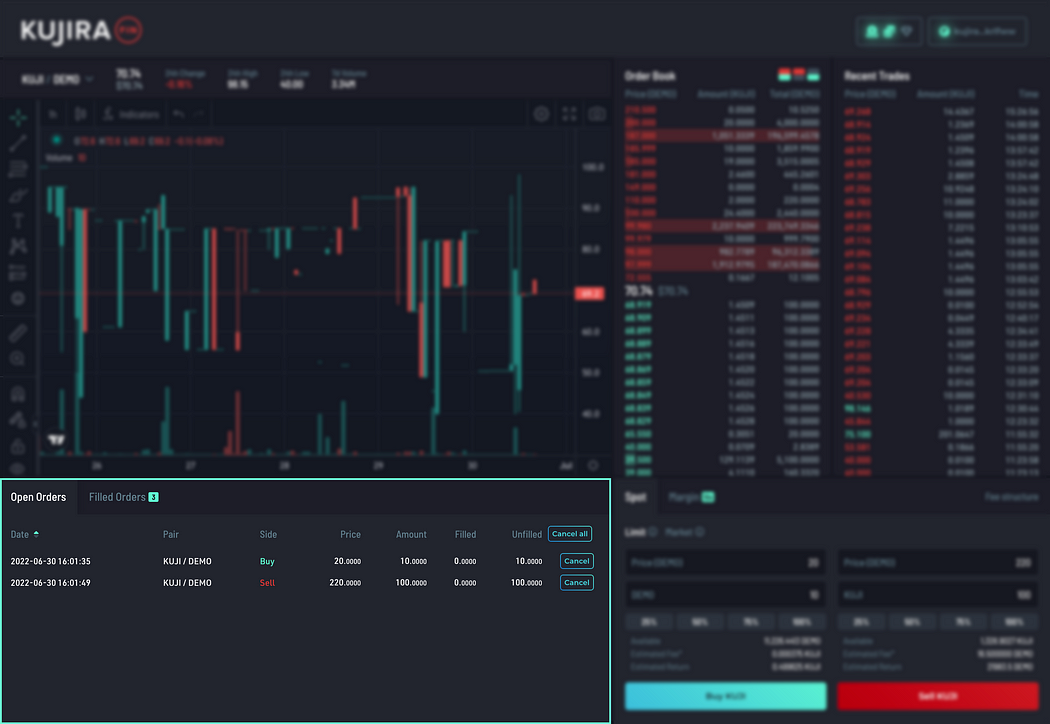
Open Orders
Any limit orders that have not been filled yet will appear here. You can find information on your order here such as:
- Date — The date and time you placed the order.
- Pair — Asset pair you are trading.
- Side — Whether you are attempting to buy or sell.
- Price — The price you are attempting to trade at.
- Amount — The number of tokens you are attempting to trade.
- Filled — How much of your limit order has been filled already.
- Unfilled — How much of your limit order has not been filled yet.
Filled Orders
Any limit orders that have been filled (even if only partially) will be shown here. The information shown is the same as before, with a “Claim” button that allows you to withdraw any successfully filled tokens.
Different Trading Phases of FIN
Trading on FIN will occur in two phases, beginning with the Bootstrapping Phase, and concluding with Full Trading Mode. Any new trading pairs will undergo this process, so it’s worth understanding how they work.
Bootstrapping Phase
This is the first step that occurs when a new token pair is created on FIN. During this phase, only limit orders are allowed to be placed in order to fill out the orderbook. When enough limit orders have been placed, the orderbook will have enough liquidity to facilitate trades, and trading will move to the next phase, Full Trading Mode.
Full Trading Mode
Once the pair leaves the bootstrapping phase, users are free to trade the token pair as they would on any CEX such as Coinbase or Binance. This means you may now place market or limit orders with no restrictions.
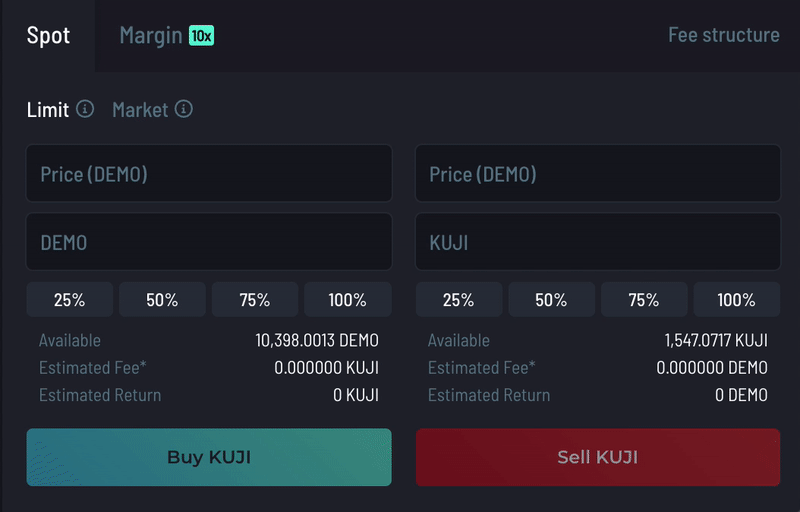
Placing A Market Order
- Make sure you have connected your wallet and that it contains some tokens for fees in your chosen gas denomination. To choose your desired trading pair, hover over the down-arrow in the top left corner and click on the pair you want.

- On the bottom right-hand side of the UI, you will see a box with the two available order options listed, Limit and Market. Click on “Market”.
- You can now see the option to buy or sell the quoted asset at market price, with buys on the left-hand side, and sells on the right-hand side. To trade, simply input the number of tokens you wish to buy/sell. You may also use the hotkeys to sell for example 50% of the tokens available in your wallet.
- This will reveal information on your trade:
- Available — Tokens available to trade in your wallet.
- Estimated — How many tokens you are estimated to receive for the trade.
- Rate — The conversion rate between the two quoted assets.
- Fee — A transaction fee is taken for each trade on FIN.
- Slippage — The difference between the expected price of an order, and the price it actually executes at. This varies relative to the amount of liquidity in the orderbook at current prices.
- To execute the trade, simply click buy (in blue) or sell (in red) and sign the transaction in the wallet popup. Unless validators on Kujira configure a pre-set minimum gas price, it won’t matter which option you pick to pay the fees.

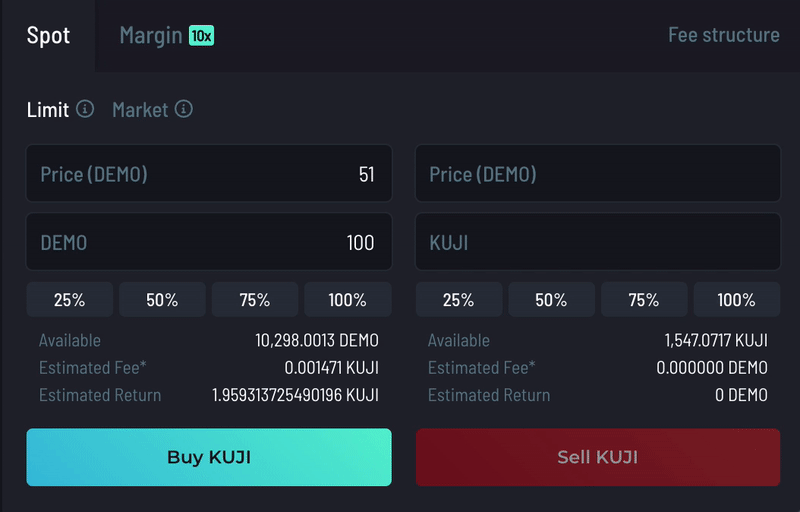
Placing A Limit Buy
- Make sure you have connected a wallet that contains some tokens for fees in your chosen gas denomination. To choose your desired trading pair, hover over the down-arrow in the top left corner and click on the token of interest.

- On the bottom right-hand side of the UI, you will see a box with the two available order options listed, Limit and Market. Click on “Limit”.
- In the “Price” box, input the price you wish to buy the quoted token at. The higher your order is listed in the orderbook, the more likely it is to be filled since market-sells begin by executing the highest bids.
- Under the “Price” box, input the number of tokens you would like to trade for the asset of interest. Often, this will be a stablecoin such as USDC, however other trading pairs will exist without a stablecoin.
- You will now see an estimated return from the trade once it executes, and an estimated fee for the transaction. Click the “Buy” button and approve the transaction from the Keplr wallet popup.
- Until your order is filled, it will appear in the “Open orders” tab underneath the price chart. You can cancel this order at any time, even if it has been partially filled.

- Once your order has been executed, it will appear in “Filled orders”. You may now complete the trade by clicking “Claim”, approving the transaction in the popup, and receiving your tokens. Tokens from partial fills may also be claimed in this manner if you do not wish to wait for a complete fill.
Placing A Limit Sell
- Make sure you have connected a wallet that contains some tokens for fees in your chosen gas denomination. To choose your desired trading pair, hover over the down-arrow in the top left corner and click on the token of interest.
- On the bottom right-hand side of the UI, you’ll see a box with the two available order options listed, Limit and Market. Click on “Limit”.
- In the “Price” box, enter the price you wish to sell the quoted token at. The lower your order is listed in the orderbook, the more likely it is to be filled since market buys begin by executing the lowest asks.
- Under the “Price” box, input the number of tokens you would like to trade for the asset of interest. Often, this will be a stablecoin such as USDC, however other trading pairs will exist without a stablecoin.
- You will now see an estimated return from the trade once it executes, and an estimated fee for the transaction. Click the “Sell” button and approve the transaction from the Keplr wallet popup.
- Until your order is filled, it will appear in the “Open orders” tab underneath the price chart. You can cancel this order at any time, even if it has been partially filled.
- Once your order has been executed, it will appear in “Filled orders”. You may now complete the trade by clicking “Claim”, approving the transaction in the popup, and receiving your tokens. Tokens from partial fills may also be claimed in this manner if you do not wish to wait for a complete fill.
Fees
Placing, cancelling and withdrawing trades all require contract signing. This introduces network fees at each step, however the nominal value of each fee is generally less than a few cents. 100% of all revenue generated by fees on FIN is paid to KUJI stakers. This results in real, sustainable yield to stakers that secure the network, without the need for inflationary incentives.
Maker And Taker Fees
These are fees taken when a trader either provides liquidity (through limit orders) or takes away liquidity (through market orders).
Trade orders receive a maker fee if the trade is not matched immediately against an order in the orderbook, therefore adding liquidity in the form of a limit order. FIN maker fees are over 50% less than traditional maker fees, set at 0.075%, making it cheaper to trade on Kujira.
Trade orders receive a taker fee if the trade is matched immediately against an order in the orderbook. All market orders will receive a taker fee, which in FIN is calculated at 0.15% compared to the traditional 0.26%.
Frequently Asked Questions (FAQ)
Why are there sometimes price spikes?
When liquidity is thin, a large market order will often execute many limit orders at once, pushing price up quickly in one spike. For example, a large market buy order will execute many limit sells at once, pushing the lowest ask higher. Remember that price is simply an average of the lowest ask and highest bid.
What happens if I set a limit sell at a really low price?
If you accidentally set a limit sell at a really low price, the order will fill beginning with the highest buy orders first, similar to a market sell. This is to protect you against extremely unfair trades taken by accident, where the fill price is far away from the market price.